
Blog
Google Forms for Event Registration: How to Set It Up
Learn how to use Google Forms for event registration: start from the template, validate answers, set a response limit and share the form.
Published November 18, 2026
To set up Google Forms for event registration, open forms.google.com, pick the Event Registration template, edit the questions to fit your event, and link the responses to a Google Sheet. Then add a short Apps Script that closes the form when seats run out. The whole build takes under half an hour, costs nothing, and suits workshops, classes, meetups and small conferences.
The trouble is that the template is generic and Google Forms has no built-in response limit or payment option. A careless build leaves you with messy sheets, duplicate sign-ups and a 51st registration for a 50-seat room. Most guides stop at “add questions and share the link”, which is exactly where the real problems begin.
This guide walks through the full job: planning the fields, building from the template, validating answers, setting a response limit and deadline, and sharing the form. You get a sample question set and copy-ready scripts. Pi-Square helps small businesses sell tickets, take registrations and collect advance payments from one link, so we also show you where a form stops being enough.
What to decide before you open Google Forms
Decide four things first: which details you need, how many seats you have, when registration closes, and how people will pay. Five minutes of planning saves you from rebuilding the form later, because editing questions after responses arrive can leave stray columns in your Sheet.
Pick the fields you need
Ask only for what you will actually use. Every extra field lowers the number of people who finish. This table works as a sample event registration form, and you can copy it question by question.
| Field | Question type | Required |
|---|---|---|
| Full name | Short answer | Yes |
| Email address | Short answer with email validation | Yes |
| Mobile number | Short answer with pattern validation | Yes |
| Ticket type or session | Dropdown or multiple choice | Yes |
| Dietary needs | Checkboxes with an “Other” option | No |
| How did you hear about us | Multiple choice | No |
Keep one attendee per response. If one person registers three guests, your response count no longer matches your seat count, and the capacity script in Step 3 will miscount.
Set your capacity, deadline and payment plan
Write down your seat count and the date registration closes. You need both numbers in Step 3, and Google Forms enforces neither on its own.
Then decide how money works. Google Forms cannot collect payments. For a free event that does not matter. For a paid one, you can show a UPI ID in the confirmation message and match payments against the Sheet by hand. That works for 20 or 30 people and gets tedious beyond that.
A form is only as good as the decisions you make before you build it.
Step 1. Start from the template and edit the questions
Open forms.google.com, click Template gallery, and choose Event Registration. It gives you a working form with the usual contact and event questions, so you edit instead of starting from a blank page.

Open and customize the template
Follow these steps in order:
- Sign in at forms.google.com with your Google account.
- Click Template gallery at the top right and select Event Registration.
- Rename the form with the event name and date, for example “Sourdough Workshop, 14 Dec”.
- Delete every question you do not need, then add the fields from your table.
- Turn on the Required toggle for name, email, mobile number and ticket type.
The same method works if you want a form for a webinar, a class or a community meetup. Only the questions change.
Keep the form short and in logical order
Put identity questions first, choices second and optional questions last. People who reach the optional questions are already committed, so they rarely quit there.
Use the form description for the date, time and venue, so people know they are on the right page. Keep directions, parking notes and dress code for the confirmation message in Step 2. The form has one job: collecting a valid sign-up.
Start from the template, then delete until only the questions you will use remain.
Step 2. Validate answers and write the confirmation
Response validation stops bad data at the door, and the confirmation message tells people what happens next. Set up both before you share the form, because fixing a Sheet full of typos is slower than preventing them.
Add validation to email and phone
On any Short answer question, click the three dots at the bottom right and choose Response validation. For email, pick Text, then Email. For an Indian mobile number, pick Text, then Regular expression, then Matches, and paste this pattern:
^[6-9][0-9]{9}$
This accepts a 10-digit mobile number starting with 6, 7, 8 or 9, with no country code. Add a custom error text such as “Enter a 10-digit mobile number”. If you expect attendees from abroad, use Number, then Is number, instead.
Collect emails and write the confirmation
Open Settings, then Responses, and turn on Collect email addresses. Choose “Responder input” if your audience may not use Google accounts, since “Verified” forces a sign-in. Switch on “Send responders a copy of their response” so each person gets a receipt.
Next go to Settings, then Presentation, and replace the default confirmation message. The default says only that your response was recorded. Paste something like this and edit it:
You're registered for [event name] on [date] at [time], [venue].
Check your inbox for a copy of your response.
Paid event? Pay [amount] to UPI ID [your UPI ID] and add your name in the note.
Questions? Message us on WhatsApp at [number].
Validate at the form, and your Sheet stays clean enough to use as a guest list.
Step 3. Cap responses and set a deadline
Google Forms has no built-in response limit, so you add one with a short Apps Script that closes the form at your seat count or deadline. The “Limit to 1 response” setting only stops one person from submitting twice and forces a Google sign-in, so it is not a capacity control.
Close the form when seats run out
Say you are running a 40-seat workshop. The script below closes the form the moment the 40th response arrives and shows a waitlist message.
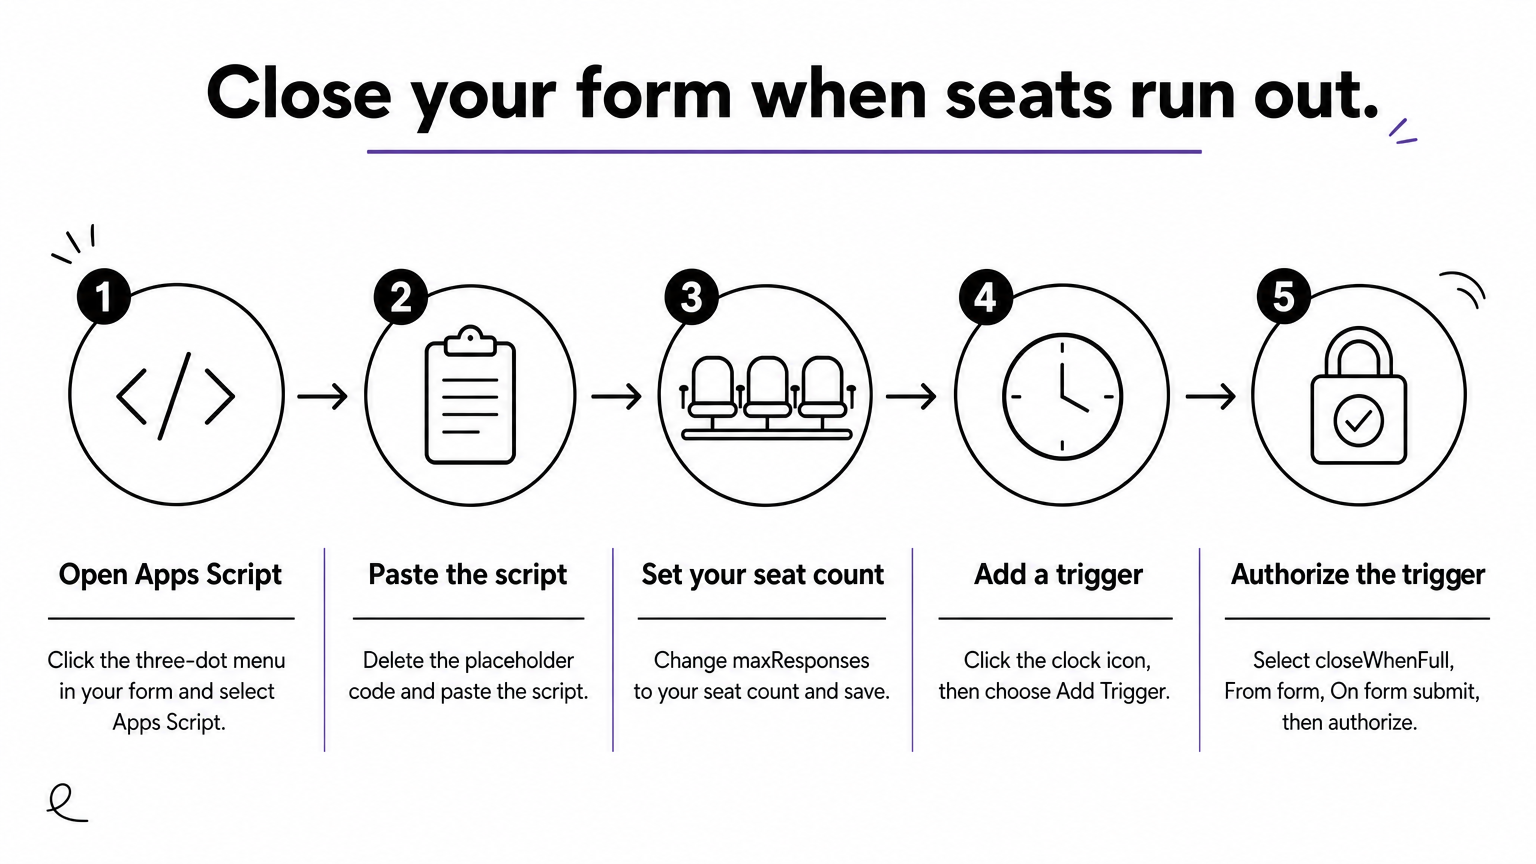
- In your form, click the three-dot menu and open Apps Script.
- Delete the placeholder code and paste the script below.
- Change
maxResponsesto your seat count and save. - Click the clock icon (Triggers), then Add Trigger.
- Choose
closeWhenFull, event source From form, event type On form submit, then save and authorize.
function closeWhenFull() {
  var form = FormApp.getActiveForm();
  var maxResponses = 40;
  if (form.getResponses().length >= maxResponses) {
    form.setAcceptingResponses(false);
    form.setCustomClosedFormMessage(
      'Registration is full. Message us to join the waitlist.');
  }
}
Test it first with maxResponses set to 2 and two dummy submissions. Then set the real number and delete the test responses.
Close the form at your deadline
For a date-based cutoff, add a second function to the same script and give it a time trigger.
function closeAtDeadline() {
  var form = FormApp.getActiveForm();
  form.setAcceptingResponses(false);
  form.setCustomClosedFormMessage('Registration has closed for this event.');
}
Add a trigger for closeAtDeadline, choose Time-driven, then Specific date and time, and enter your cutoff. If you prefer to skip scripts, open the Responses tab and switch off “Accepting responses” by hand. That works, but only if you remember.
Google Forms will not stop at seat 41 unless you tell it to.
Step 4. Share the form and track registrations
Share the form link where your audience already is, and treat the linked Google Sheet as your guest list. For most small sellers and organizers in India that means WhatsApp groups and broadcast lists, plus an embed on the event page.
Share, embed and link to Sheets
Do these four things before you announce the event:

- Click Send, copy the link, and tick Shorten URL for a cleaner message.
- Open the embed tab (
< >) and copy the iframe code if you want the form on your own page. - In the Responses tab, click Link to Sheets so every sign-up lands in a spreadsheet.
- In the same tab, use the three-dot menu to turn on email notifications for new responses.
Then submit a test registration from your phone. Check the Sheet row, the receipt email and the confirmation text. Delete the test response before you go live.
Know when a form stops being enough
A form works well for free events with a few dozen guests. It struggles when you need payments, reminders or a ticket per person. Every one of those becomes a manual task in your Sheet and your WhatsApp chats.
At that point a commerce link does the job better. Pi-Square lets event organizers create a shareable link for tickets, registrations and advance payments, and attendees need no app. You can start free, with 10 items and 30 orders a month. The Pro plan at ₹300 a month raises that to 100 items and 300 orders a month, and Growth at ₹1,000 a month gives you unlimited orders. You can also add custom fields such as dates and slots to the checkout.
Use Google Forms while registration is simple, and move on when payments and reminders start eating your evenings.
Your event form, start to finish
A good Google Form for event registration comes down to four moves. Plan the fields, build from the template, validate and confirm, then cap responses with a script and a deadline. Share the link, watch the Sheet, and test once from your phone before you announce.
If your next event needs ticket payments, advance bookings or WhatsApp follow-up without the spreadsheet juggling, you can create a free commerce link with Pi-Square and sell tickets and registrations from one page.